How to Drive eCommerce Sales Using Facebook Ads
When I asked one of my clients “Why haven’t you ever used Facebook Ads before”, he said, “I just never knew how cool it is”.
For the last 5 years, I’ve been working with eCommerce Shops using Facebook Ads and I’ve met a lot of people who underestimate this network for some reason.
It seems like it appears because people systematically make the same mistakes.
For these 8 years, the amount of media buyers has been growing rapidly. And new buyers always have a lack of knowledge about marketing and how the network works.

This produces lots of mistakes and when I usually show the clients I consult, how to fix it and do everything right, they look confused, like “why didn’t I know about this”.
However, if we look at the statistics, we’ll discover why we should pay more attention to Facebook Ads.
Firstly, as we can see, every year Facebook and Instagram increase one of their most significant metrics — MAU (monthly active users). Why is it so important? Simply because it shows how many people you and your business can reach with Facebook Ads. This directly indicates your potential audience size.


But does this audience buy any products online?
Let’s check out those two charts
The first one shows the rising trend of Facebook Ad Spending. As you can see, businesses are spending more and more money every year on Facebook Ads. It definitely shows how valuable this network is.

The second one shows the value of social eCommerce sales and its forecast. Clearly, the chart indicates that Paid Social in eCommerce is a strong trend that will only gain power.

So, What Should People Do To Drive Their Sales Via Facebook Ads?
The first and the most significant thing is preparation!
You might think like “Hm, it’s obvious. Why do we even talk about this?”
Well, my experience shows that such simple things are the most underestimated. And regularly, people forget about it.
What Is Preparation?
Often people only pay attention to campaign setup, creatives and what is going on inside the Ads Manager. As a result, people don’t notice the really big problems that prevent them from growing.
So, let’s talk about what we can do to avoid mistakes outside of the Ads Manager.
Competitor analysis
I’m sure you know all about your competitors. I see that many businesses do this analysis, collecting a lot of information. BUT… Now we don’t need a thick book with incoherent facts about your competitors. We don’t need to go deep into their business. We just should have a look at the advertising ways they use.
So, what should we do?
Just take a few of your competitors which advertise on Facebook Ads. And check out the creatives and funnels they use. You can easily do it using Facebook Ads Library. Here you can find out the best practices and edit yours using the new experience.

What should you pay attention to?
Check out the most relevant creatives. What headlines do they use? How do they position a product? What pain points are they pushing on? What type of creatives do they use? How do they build the structure of the copy?
It’s really important to understand what kind of communication works.
Then you should follow the link and examine the whole sales funnel. Try to find all advantages you can use.
Brand strategy analysis
Now you need to do a review of your brand and product. Analyse what advantages your brand has. How you can use them. How do you position your product and what makes your product unique on the market.
You can use all this to make creative ads.
TA analysis
The same situation as with the competitor analysis. Don’t spend years on this stuff. You just need to consider your customer and realize who they are, what they want, how you should communicate with them, and discover at what step of the Awareness Ladder they are on.
This will help you build excellent communication.
Short tip. Sometimes it’s hard to understand who your particular client is and create its profile. In this case, you can think about who definitely is not your client. And who you don’t want to work with.
Here you can also read our article about Jobs To Be Done.
Funnel assessment, functionality tests
Millions of times we faced the problem when even small mistakes or bugs ruin all work.
You have to be confident that everything in your funnel works perfectly. You can’t afford any bugs or complications for your customers. Just go through the entire funnel and make sure that every step works correctly.
Facebook Pixel set up
Actually, this part should be in the previous paragraph. But I’ve noticed that many people don’t understand what Facebook Pixel is, and why it is so important.
What is it?
It’s a piece of code that you place on your website. It collects data and sends it to Facebook.
Why is it so valuable?
Firstly, it gives us analytics data. If you don’t know something, you can’t control it. Thus, if you want to understand which campaign or even ad gives you results and scale them you have to collect data. And Pixel gives you this opportunity
Secondly, it gives us optimisation data. It means that our campaigns will be able to learn. Imagine that you have all the information about someone who bought your product. Now imagine there are hundreds and thousands of them. And all of these people have similar interests, behavior, and hobbies. So if you want to find a new one, you take that data and search for similar people.
That’s exactly what Facebook does. It takes some information about the client who made the target action you chose (for example, purchase) and tries to find a similar customer who will repeat that action. In addition, the neural networks created by Facebook allow this analysis to be extremely fast and accurate. This makes it possible to target those people you need.
For sure, not everything goes well. With the coming of IOS 14.5 data has become less correct. These updates really affect on the Facebook system. But it’s still a profitable traffic channel and most gurus already know how to work in the new circumstances.
How to set up it?
Actually, there are 3 different ways.
1. Integration
If your website is made on Shopify, you can just go to settings, fill in the pixel, ID and it’s done. This is the best and the easiest way to set up your pixel. The platform configures all pixel events for you and connects the server-side API that will help to reduce IOS 14 influence.

2. GTM set up
If you use another platform that isn’t able to integrate your Pixel, you can use Google Solution. Google tag manager allows you to set up a pixel without interaction in code. You just have to paste a piece of GTM code into your website and then set up Pixel inside the GTM. The problem is that you’re supposed to deal with code, so I’d recommend you turn to professionals.

3. Manual set up
You make all manipulations with Pixel inside the code of your website. Firstly, you have to paste basic Pixel code. And then set up all the necessary events. You have to be really good at programming to do this.

Product segmentation
In general, this is one of the most important things that most media buyers don’t do. Of course, it only relates to eCommerce with a big amount of goods.
So, the point is, that in your advertising campaigns you can’t promote all the goods in one ad. Or even in one campaign.
You have to split all your products to create the most relevant ads.
You may say: “So what is the difficulty? We already have categories on our website”
Yes, that’s true. But product segmentation for paid ads is a little bit more complex.
Firstly, we have to understand that we spend money to get traffic from Facebook Ads. And sometimes these costs are really high. To make our campaign profitable, we have to include these costs in the unit economics of our project. Taking into account that different goods in one category may have different marginality, we should structure our ads considering this fact.
Okay, marginality is a significant characteristic for product segmentation in your ads.
What else?
Then we should pay attention to the categories. Not the ones on your website. In the preparation stage, we discussed TA segmentation. This is the way to structure your goods.
Let me show you an example. Imagine you have a household goods store where you split all your goods into categories, like pillows, planters, robes, candles, table lamps, etc. When creating a new ad campaign, you can also split your goods as gifts and combine a few categories like candles, frames, pillows, etc.
You have unlimited possibilities to combine your goods.
Also, you should consider those parameters like price, sales, discounts and more.
Actually, this topic requires a special article. So, maybe I’ll describe it in detail one day.
But now let’s go further.
Campaigns
Finally, let’s move on to the Ads Manager. As I’ve said at the start, this article is a guide with tips for entrepreneurs who have already had a disappointing experience working with Facebook Ads, or have never worked, or already work successfully but want to increase the results. It’s definitely not a course where I can explain all the details about the platform and marketing at all. So, in this part, I’m not going to explain how to work with Ads Manager, what the interface looks like, and how to use it. I’ll give you a little bit more advanced vision and some strategies that you can be based on.
Objectives
Despite what I’ve just said above, I have to clarify this obvious topic for some people.
So what objectives are?
As you may remember, I’ve talked about Facebook Pixel and campaign learning. We discovered that Facebook helps us to find people who are more likely to make the target action. So, your advertising objective is what you want people to do when they see your ads.

But what the target action is?
Usually, it’s a piece of code you mark some action on your website with. For example, by installing Pixel on your website, you can mark a purchase action (when a customer has paid for the order) and Pixel will send this information to Facebook.
Choosing the objective, you also choose the target action you want people to take after seeing your ad.
On Facebook, there are many objectives, but basically, we need only two:
- Conversion
We use this objective for Prospection campaigns that aim to attract a new audience.
- Reach
We use it for Retargeting campaigns that aim to return on website people who didn’t make the purchase.
You may ask, why don’t we use conversion campaigns for retargeting? We need purchases and conversion objectives were created for this.
Yes, it was. But conversion campaigns require broad audiences to find specifically the customers you need. And retargeting campaigns don’t have enough audience for that. So campaigns with a reach objective allow us to show our ads to every person.
Structures
Finally, getting to the most interesting part.
In your cabinet you can create any structure you want. It’ll always include a campaign, ad sets inside it, and ads.
Maybe you have already heard about existing methods, like “shotgun” with different bid strategies, but I’m going to tell you basic things that will allow you to create any structure you need. Or at least avoid mistakes.
So what do we need to know about structures?
In general, they can be of two types. Prospection and Retargeting. They have different goals. The first one brings new audiences and sales. The second one returns the existing audience and pushes it for some action. It could be first purchase, up-sell or cross-sell. Basically, for eCommerce those two types are necessary.
You should also determine your budget. Because the structure is based on it. We have no rules here except one. The budget for conversion campaigns must be at least $20/daily per adset.
The budget we can allocate in two different ways. CBO and ABO
What are CBO and ABO?
ABO (Adset Budget Optimisation) — is a basic way of budget distribution when we manually set a budget for every adset.
CBO (Campaign Budget Optimisation) — is a way of budget distribution when we set a budget on the campaign level and Facebook allocates it between adsets by itself

Facebook says that CBO is totally better and even wants to keep CBO only. But the truth is that it’s only different ways of budget distribution. Manual and automatic. So, they fit for different goals and strategies.
Back to the structures.
Let’s start with the Prospection structure.

So, here I’ve described different possible combinations that you can use for your eCommerce shop.
Let’s start overview at the campaign level. Here we have 5 options.
Firstly, we can split our campaigns into separate products. In this case, our structure is 1 product — 1 campaign. This structure fits for shops with small goods selection or when they are very different.
In this campaign, we can put 2 different adset structures. It depends on our goal. We can conduct an audience or creatives test. In the first variant, we create a few adsets with different audiences (1–5 adsets) and put up to 5 ads inside. Creatives in different adsets are the same. In the second one, we make as many adsets as many creatives we have and put creatives one by one in identical adsets. So, we have the same adsets and 1 different creative ad for each of them.
Then, we can split campaigns by a specific offer. For example, in the first campaign, you promote summer collection sales and a “buy one, get one free” offer in the second one. Adset structure could be the same as in the Separate product split variant. That probably won’t be your primary campaign. It’s mostly like an additional one that you can connect to the first or the third structure. For example, create one campaign for your major product and one for a sale.
The third structure is splitting your campaigns by product categories. It gives you options to test the products inside one category on an adset level. Perhaps, it’ll be the main structure you’ll use. It’s the most multipurpose combination for one geo shop.
The last two options are split by geo. In the first one, there are geo and product categories on a campaign level. For example, in this variant you can put only pillows on the EU market in one campaign and pillows on the Asia market in the other one. Also, you can change categories for each geo if they work less well there. It gives you the opportunity to control your product distribution for each geo and test how they are in demand out there.
The second option doesn’t require a specific product or category on a campaign level. You can test it splitting by adsets. For example, you have one EU and one USA campaign with all your products on the adsets level. Technically, this structure is a simplified version of the previous one. You deprive yourself of tools to test audiences or creatives. But it makes your set-up easier and this structure requires smaller budgets. So, if you have few geo, small budgets or you have already tested your products, you can use this option.
Retargeting is a little bit more flexible

On the campaign level, you have the same combinations as for Prospection campaigns. But on the adset level, you can combine every type of audience from the list on the picture.
Yeah, retargeting adset level only differs with audiences. Usually, it doesn’t need some specific tests. Let’s go through the list.
1. Website events audiences
You can create a custom audience that will contain people that triggered an event on the website. If some amount of people added a product to the cart and triggered the AddToCart event, you gather them inside the one audience. Also, you can combine these characteristics. For example, collect in one audience people, who added to cart some product but didn’t buy anything. In that case, you can reach them with a specific campaign and push them to finish the order. Also, you can interact with prospects who made different actions on your website creating interesting communications.
2. Instagram/Facebook audiences
Probably, you already have brand pages with some audience. You can use it. Create a custom audience from your followers and reach them out with your retargeting campaigns. It allows you to communicate with engaged prospects using Facebook Ads
3. Video views custom audiences
Promoted any videos? You can reach people who have watched your videos. Sounds perfect, isn’t it? Imagine, you can promote a video about your product and then reach out with the offer to every person who watched at least 50% of it. Sometimes it gives great results
4. Custom list
You can also create a custom audience using an external database. So, if you have, for example, a database of your offline shop customers, you can reach them on Facebook.
Okay, now everything is clear about audiences and adset level. What about creatives?
Here is the thing. Simply, you can use the same creatives as in Prospection campaigns. Or you can create something different using the same approach. Also, try to make some special offers. For example, a discount for people who watched your website 3+ times per month but didn’t buy anything. Such offers will push them to make a purchase.
Someone can say that those prospection and retargeting structures are too complicated, and the structure must be more simple. That approach also can exist, so I only gave you some possible combinations you can use in different situations and projects.
Worldwide geo combinations
It doesn’t have to be a rule, but I’m gonna give you some advice. In most cases, you don’t need to separate every country you have. But keeping all of them in one campaign is also not very kind.
So I suggest you categorize them to have similar CPM and mentality
I use these categories:
- The USA + Canada
- UK + Australia
- Europe A (Expensive part of EU market)
- Europe B (Cheap part of EU market)
- Arab countries
- Asia A (Expensive part of Asia market)
- Asia B (Cheap part of the Asia market)
- Latin America
- Africa
For me, that segmentation is very supportive of campaign management.
Creative ads
The next important step is creatives.
For me, creatives are really crucial assets that push your customer to make a decision. It starts with a video/banner/gallery and ends with the right copy. So, this is the thing, you must spend more time making it than anything else.
Let’s go deeper into the topic
I divide three global types of creatives that you can use in Facebook Ads:
- Gallery
- Banners
- Video
All these ad types are great for eCommerce shops and I highly recommend testing them all.
Let’s find out a few examples.
Gallery
It’s basic ads for all eCommerce that have a few different products or categories.
White background
A basic way to show your goods. White background makes your creativity noticeable and highlights the product

Interior background
Just put your product inside some kind of interior and it’ll look more natural. Or use models if we are talking about the clothing

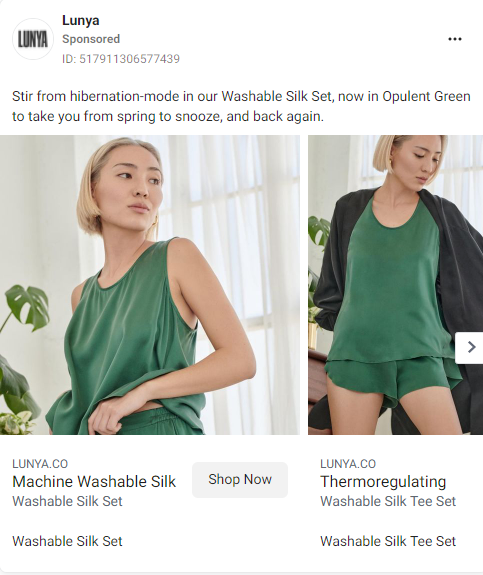
Storytelling
If you have only one product, you can tell a story about it using a gallery. A good way to show more info.
Banners
That’s like a gallery but only one =) You can also use a white background photo or show your product inside the interior. But also banners help you to design your creativity. It doesn’t really fit for clothing, but many other products go well with this.

Video
This is my favorite part.
To my mind, despite higher CPM, a good video allows you to create better positioning for your product. I won’t tell you about the basics as I did before. Here are some features you can implement
Video compilation with advantages/offers
Just a basic way to show your product and some bullets
Review
Video review helps you to create trust between you and your customer. They really work. Especially, when you use a review of a famous blogger
Product switch
Just show available options to your customer
Reaction
Show people’s reactions to your product. Let your customer imagine those feelings
Comparison Ad
Demonstrate your competitive advantage to your customer using video compariso
Video Instructions
Show people how to use your product. Guides are a good way to attract customers’ attention.
Hope I gave you some ideas. You don’t need to use those types in the same way, but maybe you get inspired and will create something that will bring you money.
Conversion Rate Optimisation
I was thinking, what should I write here about. The thing is that CRO is a broad topic and requires a separate article.
Why CRO is important?
Simply, it allows you to lower your customer acquisition costs outside the Ads Manager. We need to understand that Facebook also has some limits. For some reasons, like auctions and competition, we can’t always reduce costs there. So CRO is a good way to get more money to improve your website.
Firstly, we have to understand the basics of CRO.
The whole CRO builds on the A/B tests. It’s user experience research that consists of experiments with two variants. For example, you have a landing page with your product. And you want to figure out what is the best price for it. In this case, you can provide an A/B test experiment using Google Optimize or the Facebook A/B test tool.
So, what are these?
Google Optimize is a tool that allows you to create duplicates of your landing page and randomly allocate income traffic between them evenly.
Facebook A/B test is a tool inside the network that makes the same thing as Google Optimize. So if you can’t set up Google Optimize for some reason, just create duplicates of the landing page you want to test and put them inside the Facebook A/B experiment.
How can they help you?
For example, your avg Conversion Rate is 2%. You want to figure out how the website color palette affects it. You create an experiment in Google Optimize with 5 variants of different colors. After the test, you discover that if your website is red, your CR is 3%. In that case, you increase the number of orders in x1.5 times.
As you can see even a small change of 1% can significantly transform your results
What should you basically pay attention to?
I’ll tell you some mistakes I often see when we start our work with new clients. These tips may increase your CR if you haven’t implemented them before
1. Speed test
It’s incredibly important to make your website load fast. Probably none of your customers would wait at least 7 seconds while your website is loading. The most simple way to check it is https://pagespeed.web.dev/ web tool from Google.

2. Mobile Optimisation
If you want to work with social media, your website must be perfect on any mobile device. Just go through the whole website using different smartphones and check out if everything is okay.
3. Testimonials
Add testimonials to every product page. It gives your customers the ability to see other satisfied customers and make sure that they can trust you. Video reviews will also be an ideal variant

4. Video reviews
Add video reviews of your products or add some GIFs to the product page instead of static images. It’ll be a good demonstration for your potential client

5. Guarantee
Nowadays, most shops have a money-back guarantee. It’s not only a must-have feature but also a good addition to your offer. This totally eliminates risks for your customers and overcomes their psychological resistance
6. Clear ordering
Make sure that it’s easy to make a purchase on your website. Don’t request your client to fill the unnecessary forms. Give a clear instruction on how to go step-by-step through the checkout. Add a call to action on every step.
That were a few common tips that I usually give my clients. So, you shouldn’t underestimate them. My huge experience says that they really make the website convert your prospects better.
In the end, I want to say that now you have a huge arsenal that will help you to increase income from your eCommerce shop. That was really strong, but simple advice I’ve discovered for the last 5 years I’ve been working with eCommerce shops. Unfortunately, the overall majority ignores these basic things and loses Facebook Ads as a powerful channel of cash flow.
If you are one of those people who don’t play well with Facebook Ads or got good results and want to scale them vend.agency is here to help!
A great way to start getting to know your business - just to call. Leave a form, and we will delve into your enterprise challenges and offer the best solutions.

